For this pattern, you need to be familiar with how to do a Front Post Stitch (fps). Doing it into a sc is easier than it sounds: Insert hook into both loops, then insert hook into the BACK of both loops of the NEXT stitch. Then finish like a normal sc.
Identifying stitches when a fps is involved can be a little tricky. Once placed, the stitch afterwards likes to “disappear” behind it. That’s why this pattern involves just skipping that stitch instead of trying to fish it back out.
The pattern:
Start with Orange, Yellow, or other desired main pumpkin color.
1. MC 6sc
2. inc6 (12)
3. (inc, sc)x6 (18)
4. (inc, 2sc)x6 (24)
5. (sc, inc, 2sc)x6 (30)
Be sure your fps always happen in the same stitches every row, very important!
6. (inc, fps, skip next stitch, inc, sc)x6 (36)
7. (inc, sc, fps, skip next stitch, sc, inc)x6 (42)
8. (sc, inc, sc, fps, skip next stitch, sc, inc)x6 (48)
9. (2inc, 2sc, fps, skip next stitch, 2sc)x6 (54)
(If you want an even bigger pumpkin, skip to the appendix now)
10. (6sc, fps, skip next stitch, inc)x6 (54)
11 – 13. Repeat Row 10
Repeat up to 5 more times for a taller pumpkin
14. (6sc, fps, skip next stitch, 1sc)x6 (48)
15. (6sc, fps, skip next stitch)x6 (42)
16. (5sc, fps, skip next stitch)x6, sc (36)
17. (4sc, fps, skip next stitch)x6, sc (30)
18. (3sc, fps, skip next stitch)x6, sc (24)
19. (2sc, fps, skip next stitch)x6, sc (18)
20. (sc, fps, skip next stitch)x7 (yes, seven, so the end of the row moves here) (12)
Stuff firmly. Switch to green (or brown or grey). Leave a long tail behind in orange (or whatever your main color is)
21. (fps, skip next stitch)x6 (6)
22-23. 6sc
24. hdc, dc, tb, ch3, slp to previous tb, dc, hdc
slp stitch into the post of the previous row, then again in the row before that.
25. loosely ch 9
26. skip first chain (turning chain), (3sc in one stitch)x8
slp into the base of the stem. tie off.
Use the orange tail to close up row 18. Then pull it through the middle of the pumpkin down to row 1, pull tight, and tie it to a stitch in row 1. Pull up through the top and the bottom again a few more times, if needed, to make the right shape.
Appendix
1. (2sc, inc, 3sc, fps, skip next stitch, inc)x6 (60)
2. (3sc, inc, 3sc, fps, skip next stitch, inc)x6 (66)
3. (8sc, fps, skip next stitch, inc)x6 (66)
4-6. Repeat Row 3
7. (8sc, fps, skip next stitch, 2sc)x6 (60)
8. (7sc, fps, skip next stitch, 2sc)x6 (54)
Proceed to row 13 above
Some notes!
You can make this as a sitting version or a standing version. The standing version is easier to hold and play with, if you’re making this for a kid. The sitting version is nice as a decoration, especially if you make these as small as I do.
Recommended colors for this pattern include black. However, if you’re still a beginner with crochet/amigurumi, black is a very difficult color to work with, so you may want to consider a different color instead. This pattern can work with lots of different colors.
Stuff the arm
if needed, remove a stitch so the color change is on the bottom, then sc edges together (6) then tie off.
Make two.
Legs
Start with black (shoes color)
1. MC 6sc
2. inc6 (12)
3. (1sc, 1inc)x6 (18)
4. (2sc, 1inc)x6 (24)
5 – 7. 24sc
8. 11sc, dec, 11sc (23)
Switch to brown (pants color)
9. dec, 21sc (22)
10. 10sc, dec, 10sc (21)
11. 19sc, dec (20)
12. 9sc, dec, 9sc (19)
13. dec, 17sc (18)
14. 18sc
15. 8sc, dec, 8sc (17)
16. 17sc
17. dec, 15sc (16)
18. 16sc
19. 7sc, dec, 7sc (15)
20. 15sc
21. dec, 13sc (14)
22 – 24. 14sc
Stuff the leg. Decide now if you’re making the sitting or standing version.
Standing version: inc, 13 (15) then tie off.
Sitting version: (dec, 5sc)x2 (12) Add 3sc (so the color change is hidden on the bottom) then sc both sides together (6) then tie off.
Make two.
Neck screws
Use some shade of gray/silver
1.8MC using hdc. join with a slp, then ch1
2. Use BLO. Insert hook then draw up in the first 4 scs. Yarn over and draw through all 5 loops on hook, then ch1 (pull this chain tight). Then do this again for the other 4 stitches.
3. Find the first stitch where you drew through all 5 loops. Insert hook from WRONG side, then slip stitch. Tie off.
Make two.
Bangs
Start in black or dark brown (hair color) Scallop: dc, 1ch, dc all in one stitch
1. foundation chain 14
2. ch1 (turning stitch) 1sc, (scallop, 1sc)x3, 1sc, (1sc, scallop)x3, 1sc (15)
Tie off
Head
Start with joined rounds, use hair color
Don’t cross yarn when changing colors, cut and tie off each time.
Corner stitch: 1sc, 1hdc, 1sc in one stitch
1. MC 8sc
2. (1sc, Corner stch)x4 (16)
3. (2sc, Corner stch, 1sc)x4 (24)
4. (3sc, Corner stch, 2sc)x4 (32)
5. (4sc, Corner stch, 3sc)x4 (40)
6. (5sc, Corner stch, 4sc)x4 (48)
7. (6sc, Corner stch, 5sc)x4 (56)
8. (7sc, Corner stch, 6sc)x4 (64)
9. (8sc, Corner stch, 7sc)x4 (72)
(insert hook into head first, bangs second)
10. BLO: 9sc, 1hdc, 17sc, 1hdc, 1sc, 15slp into bangs as well (insert hook into FLO of head first, bangs second), 1sc, 1hdc, 17sc, 1hdc, 8sc (72)
Do the rest in the round.
11. 8sc, dec, 1sc, 15sc into remaining back loop from prev row, 1sc, dec, 16sc, dec, 16sc, dec, 7sc (68)
Prepare green yarn (skin color)
??. 19sc, (switch to green), 30sc, (black) 18sc
(might need to be 31sc to be symmetrical actually)
12 – 15. 68sc changing colors throughout to match the same color as previous stitches
17. This time, change to green 5sc earlier, and end 6sc later (68)
(add ears some time in the next couple rows)
18 – ??. 68sc changing colors throughout to match the same color as previous stitches
25. Continue up to where green yarn begins and change color as usual, but then continue on with green
26. 24sc, bc in black, 15sc, bc in black, 27sc (68)
If you’ve noticed that his bangs like to fly away from his face, take a moment now to sew down their tips.
(rounding out the front of the face)
The group (inc, sc)x4 (8sc total) should happen directly in the center of the face. Give or take a few sc if you need to.
32sc, (inc, sc)x4 28sc (72)
72sc
(16sc, dec)x4 (68)
7sc, dec, (15sc, dec)x3, 8sc (64)
(dramatic dec’s on 7’s to the neck. But biased to slope towards the back of the neck)
5sc, (6sc, dec)x7, 3sc (57)
7sc, dec, (5sc, dec)x6, 6sc (50)
6sc, (4sc, dec)x7, 2sc (43)
(6sc, dec)x5, 3sc (38)
3sc, (5sc, dec)x5 (33)
5sc, dec, (4sc, dec)x4, 2sc (28)
2sc, (3sc, dec)x5, 1sc (23)
stuff lightly
3sc, dec, (2sc, dec)x4, 2sc (18)
slp around. Do the next row into these slip stitches AND the row before them.
stuff firmly
4sc (1, dec)x4, 2sc (14)
slp around. Do the next row into these slip stitches AND the row before them.
Prepare to add screws
How to add the screws: Hold the screw facing towards you so that the magic circle is on the bottom. Find those two stitches that each drew up through 5 loops. Insert your crochet hook between them. A chain and a slip stitch should be above your hook (more or less).
37. adds screws within 14sc (you will need to eyeball it because the location changed depending on your tension, but it will probably be around 6sc in. Then do the other one 7sc later)
38. slip stitch around.
38. do these stitches into the slp AND the sc row below it. (1sc, inc, 3sc, inc, 1sc)x2 (18) then add an extra 5sc or so, so the color change is hidden on the back. The next row now starts there.
Switch to black (or whatever shirt color you want)
24. (2sc, inc)x6 (24)
25. (3sc, inc)x6 (30)
Attach the arms in the next row. Their location will depend a bit depending on your tension. Find the sitch on the left side below the screw that is most centered to that side of the body, then coutnt 3 stitches backwards (towards the start of the row) and start crocheting the arm there (starting opposite end of the yarn tail) after 9sc later, do the other arm (using same end as yarn tail)
26. Attach arms in this row (each 6 wide) (30)
27 – ??. 30sc
Add a few more sc so the color change is hidden in the back, then switch to pants color
??. 30sc
If you’re making the standing version, do the next row. If you’re making the sitting version, skip to the next one.
slpstch into wrong side of legs, then body. After first leg is attached, stuff body, then crochet around other leg + body. At the end, insert hook through back of body and out through the front of body and slp once, then finish and tie off.
Sitting version:
??. (3sc, dec)x6 (30)
??. (2sc, dec)x6 (24)
Stuff partially
??. (1sc, dec)x6 (12)
Stuff firmly
??. 6 dec
Finish off
Crochet ears into the side of the head in row ???? Insert crochet hook parallel to the body. sc, hdcx3, sc. Finish off. Do on both sides.
How to use this pattern: This pattern is split into “Sections” depending on what kinds of traits you want your fish to have. Sections contain multiple versions of each trait, you should only use one version of each Section.
1. MC 6
(repeat Row 1 once for a pointier face)
2. incx6 (12)
3. 12sc (skip this row for a rounder head,
or repeat it for a pointier head)
4. (inc, 1sc)x6 (18)
5. 18sc (skip this row for a rounder head,
or repeat it for a pointier head)
6. (inc, 2sc)x6 (24)
Section 2: Eyes
1. 4sc, bobble stitch using eye color, 12sc main color, bobble stitch using eye color, 6sc
2-3. 24sc
Section 3: Fins
Choose a Fin Stitch below. When you get to that part, these stitches are all done in the single front loop of your current stitch.
Tiny: slp, ch3, dc, ch3, slph
Medium: slp, ch3, dc3, ch3, slp
Pointy: slp, ch3, dc, tp, ch3, slp in 1st ch, tp, dc, ch3, slp
Leaf: slp, ch5, slp into 3rd chain, dc2, ch3, slp into 1st ch, dc2, ch3, slp into 1st ch, ch2, slp
Round: slp, hdc, dc, tp, ch, tp, dc, hdc, slp
BIG: slp. 2ch. ch1 to turn into 1st stitch: (1sc, 1hdc) into 2nd stitch: (1dc, 1tp). Turn, ch5, sc into 3rd stitch, 1trp, dcinc, hdcinc, 1sc. 2slp down the side of fin to get back to the 1st row.
1. 4sc, inc, Fin, inc, 10sc, inc, Fin, inc, sc4 (28)
2. 5sc, dec behind the fin(insert hook into front loop of the stitch immediately before and after the fin, skipping the fin), sc12, dec (behind the fin the same way), sc5 (24)
Section 4: Body
1. 24sc
if you added a lot of extra rows to the face, repeat row 1 a few times too:
2. (dec, 6sc)x3 (21)
3. (dec, 5sc)x3 (18)
4. (dec, 4sc)x3 (15)
5. (dec, 3sc)x3 (12)
6-7. 12sc
Section 5: Dorsal Fin
Optional, this is a little difficult!
First, sc around or remove a few stitches so you are at the top of the body.
Ch1, then sc sideways down the top of previous stitches until you reach a row past the eyes (usually takes 11-13 stitches). Ch1 and turn
Version 1: Smooth
hdc across, slp into first sc of previous row
Version 2: Wavy
5sc, slp in 3rd ch. hdc inc, (tp, ch, hdc) across, slp into first sc of previous row
alt: replace (tp, ch, hdc) with (tp, ch, hdc, tp, ch, hdcinc). In other words, make every other hdc into a hdcinc.
Version 3: Pointy
5sc, slp in 3rd ch. hdc inc, ch3, slp into 1st chain (hdc, ch3, slp into 1st chain) repeat to the end, slp into first sc of previous row
alt: replace (hdc, ch3, slp into 1st chain) with (hdc, ch3, slp into 1st chain, hdc inc, ch3, slp into 1st chain). In other words, make every other hdc into a hdcinc. Makes it significantly wavier.
2nd alt: replace (hdc, ch3, slp into 1st chain) with (2hdc, ch3, slp into 1st chain). Looks a little smoother.
Version 4: Scallop
ch2, 3dc in one stitch, skip next stitch, slp, (skip next stitch, 5dc in one stitch, skip next stitch, slp) across
Section 6: Tail base
Stuff the body firmly
1. (inc, sc)x6 (18)
2. (inc, 2sc)x6 (24)
3. 24sc
If this row hasn’t ended on the edge of the tail, pull out or add a few sc.
4. Squish the tail together, ch1 and sc down the side using both loops of both sides (12)
Section 7: Tail edge
If you want a really big tail, do the Smooth version first, then add a further version on top of this. If you do this, the (X)x5 sections may need to be (X)x6 instead. If you did Large Fins, a bigger tail usually looks better.
Version 1: Smooth
1. hdc inc, 10hdc, hdc inc. Finish off
Version 2: Pointy
1. ch5, slp into the 3rd chain. hdc inc, ch3, slp into 1st chain. (2hdc, ch3, slp into 1st chain)x5, hdc inc, ch3, slp into 1st chain, slp into last stitch. Finish off
Version 3: Wavy
1. ch2 (dc, tp, ch) in the first stitch, (hdc, tp, ch)x5 across, (dc, tp, ch) in the last stitch, ch1, slp into last stitch
Version 4: Scalloped
Ch2, 4dc in one stitch, skip next stitch, slp, skip next stitch (6dc in one stitch, skip, slp, skip)x2, slp, skip, 3dc in one stitch, ch2, slp into current stitch
Done in the round
1. Chain 8 (the last one is a turning stitch)
2. Sc 6 down one side of the chain. 3sc in one stitch, on the end. 6sc down the other side.
3. inc, 1sc, 2hdc, 2dc, dcinc, 3dc in one stitch, dcinc, 2dc, 2hdc, 2sc.
4. inc, sc, slp. Tie off.
You don’t have to leave a long tail for sewing, but leaving a tail (of any size) can help you keep track of which side is which. Alternately, it works well to weave the tails through the middle, since that middle chain stitch can end up with pretty big holes.
Antennae
Use a darker color
make 2
1. MC 6, slp to join
2. Ch6
3. 5sc down the side of the chain, back to the center
Your next stitch should happen in the last sc of row 1 which also has a slp stitch in it.
4. sc, slp, tie off
They usually end up a bit twisty but this honestly adds to the charm.
Body
Choose one color from your pride flag to be the main body color. Usually the lightest color of the flag works well, often white. But feel free to experiment.
Also have a dark color selected for the eyes (works well if it matches the antannae color) and have it ready for Row 6. You need to know how to switch colors mid-row, so consider this optional since it’s a little difficult.
(The eyes don’t HAVE to be darker than the body, but they should be high-contrast compared to the body)
Done in joined rows
1. 6sc MC (6)
2. incx6 (12)
3. 1, inc, 2, inc, 1, inc, 2, inc, 1, inc (17)
4. 1, inc, 3, inc, 2, inc, 3, inc, 2, inc, 1 (22)
5. 3, inc, 7, inc, 6, inc, 3 (25)
optional: switch to a darker color to make eyes
6. (main color) 6, (darker color) inc, (main color) 9, (darker color) inc, (main color) 7, inc (28)
7. 9, inc, 9, inc, 8 (30)
8. 30sc
9. 13sc, 1sc into one antanae and then body, 1sc into the other antanae and then body, 15sc (30)
Start making stripes by switching colors each row
10. 30sc
optional: do the bc stitches with your eyeball color (change back to main color on the final yarn-over, when you pull through all 5 stitches) These make feet!
11. 1sc, bc, 25sc, bc, 2sc (30)
12. 30sc
13. 12sc, 3sc into base of wing, 3sc into other wing, 12sc (30)
14. 2sc, bc, 24sc, bc, 2sc (30)
15 – 16. 30sc
17. 2sc, bc, 25sc, bc, 1sc (30)
18 – 20. 30sc
21. 9, dec, 9, dec, 8 (28)
22. 7, dec, 8, dec, 7, dec (25)
23. 3, dec, 7, dec, 6, dec, 3 (22)
24. 1, dec, 3, dec, 2, dec, 3, dec, 2, dec, 1 (17)
stuff firmly. For the stinger here I recommend you switch back to the main color or another solid color.
Switching to in-the-round here also makes the stitches easier to manage.
25. 1, dec, 2, dec, 1, dec, 2, dec, 1, dec (12)
26-27. (1, dec) repeat until 3sc are left
tie off.
Color A: Main color
Color B: Dark details
Color C: Light details
Ears
Color B (ear tip)
1. Magic circle (4)
2. (1inc, 1sc)x2 (6)
3. inc x6 (12)
4. 12sc (12)
Prepare Color A (main body color)
5. Color B 1sc; color A 2sc, inc, 1sc; color B 2sc, inc, 3sc, inc (15)
6. Color B 1sc; color A 3sc, inc, 2sc; color B 2sc, inc, 4sc, inc (18)
7. Color A 5sc, inc, 3sc; color B 2sc, inc, 5sc, inc (21)
Prepare color C (light body color), cut and tie off color B
8. color A 4sc, color C 2sc, color A inc, (6sc, 1inc)x2 (24)
9. color A 4sc, color C 3sc, color A inc, (7sc, 1inc)x2 (27)
10. color A 4sc, color C 4sc, color A inc, (8sc, 1inc)x2 (30)
11-12. color A 4sc, color C 5sc, color A 21sc (30)
13-14. color A 4sc, color C 6sc, color A 20sc (30)
15-17. color A 4sc, color C 7sc, color A 19sc (30)
finish and tie off. Leave a short tail, to help you remember where the row ends.
Make 2 ears
Arms
Start with Color B (paw color)
1. Magic circle (6)
2. inc x6 (12)
3. (5sc, inc)x2 (14)
4. (6sc, inc)x2 (16)
5. (7sc, inc)x2 (18)
6-7. sc18
8. (7sc, dec)x2 (16)
9. (6sc, dec)x2 (14)
10-12. 14sc
Change to Color A (body color), stuff the paw
13-24. 14sc
Stuff firmly
24. Fold in half, sc together (7)
Finish, tie off. Do not hide the tail yet, this will help you orient things later.
Make 2 arms
Legs
Start with Color B (paw color)
1. Magic circle (6)
2. inc x6 (12)
3. (1sc, inc)x6 (18)
4. (2sc, inc)x6 (24)
5-6. 24sc
7. 6sc, 2dec, 14sc (22)
8. 22sc
9. 6sc, 2dec, 12sc (20)
10. 20sc
11. 6sc, 2dec, 10sc (18)
12. 18sc
Change to Color A (body color), stuff the paw
13-20. 18sc
Stuff firmly
21. Fold in half, sc together (9)
Finish, tie off. Do not hide the tail yet, this will help you orient things later.
Make 2 legs
Tail
Start with Color C (light color)
1. Magic circle (6)
2. (1sc, inc)x3 (9)
3. (2sc, inc)x3 (12)
4. 12sc
5. (3sc, inc)x3 (15)
6. (4sc, inc)x3 (18)
7. 18sc
8. (5sc, inc)x3 (21)
9. (6sc, inc)x3 (24)
10. 24sc
Color A (body color)
11. (7sc, inc)x3 (27)
12. (8sc, inc)x3 (30)
13-20. 30sc
21. (8sc, dec)x3 (27)
22. (7sc, dec)x3 (24)
23. 24sc
24. (6sc, dec)x3 (21)
25. (5sc, dec)x3 (18)
26. 18sc
Stuff most of the tail
27. (4sc, dec)x3 (15)
28. (3sc, dec)x3 (12)
29. 12sc
Finish stuffing, tie off
Body
Get ready to crochet everything together
bps sc/dc = Back Post Stitch
Insert the hook into the post of the dc from behind, instead of into the top loops of the stitch. Then proceed to either sc or dc as instructed.
This preserves the top loops of the stitch, which will be used later during the head section
Color C (light color)
1. Magic circle (6)
2. inc x6 (12)
3. (sc, inc)x6 (18)
4. (2sc, inc)x6 (24)
5. 1sc, inc, (3sc, inc)x5, 2sc (30)
6. (4sc, inc)x6 (36)
7. 2sc, inc, (5sc, inc)x5, 3sc (42)
Color A (body color)
8. (6sc, inc)x6 (48)
9. 22sc, 4dc, 22sc (48)
10. 21sc, dc, 4bps dc, dc, 21sc (48)
Now we are crocheting the arms and legs on. It is important that you insert your hook into the limb first, and into the body second.
11. 2sc, 9sc into leg and body (start on the opposite end from the leg’s yarn tail)
… 2sc, 7sc into arm and body (start on the same end as the arm’s tail)
… sc, 6bps dc, sc
… 7sc into arm and body (same end as the arm’s tail)
… 2sc, 9sc into leg and body (same end from the leg’s yarn tail)
… 2s.
12. 21sc, bps sc, 4bps dc, bps sc, 18sc, 3dc into the tail and body (6 stitches away from tail’s last stitch ensure the color change is on the bottom) (48)
13. 3dc into the tail and body (6 remain on tail), 19sc, 4bps sc, 19sc, 3sc into the remaining tail stitches and body (48)
14. 3sc into the rest of the tail and body, 3sc, dec (6sc, dec)x5 (42)
15. 2sc, dec, (5sc, dec)x5, 3sc (36)
16. (4sc, dec)x6 (30)
17. 1sc, dec, (3sc, dec)x5, 2sc (24)
18. (2sc, dec)x6 (18)
19. (sc, dec)x6 (12)
Stuff!
20. dec6 (6)
Finish off
Head
Start with Color A (main body color)
1. Magic circle (6)
2. inc x6 (12)
3. (sc, inc)x6 (18)
4. (2sc, inc)x6 (24)
5. 1sc, inc, (3sc, inc)x5, 2sc (30)
6. (4sc, inc)x6 (36)
7. 2sc, inc, (5sc, inc)x5, 3sc (42)
8. (6sc, inc)x6 (48)
9. 3sc, inc, (7sc, inc)x5, 4sc (54)
10. (8sc, inc)x6 (60)
11. 4sc, inc, (9sc, inc)x5, 5sc (66)
12. (10sc, inc)x6 (72)
13. 5sc, inc, (11sc, inc)x5, 6sc (78)
14. 78sc
fold ears in half, get ready to crochet them to the head. Here’s how, when you get to that part: hold them so the light colored triangle faces away from you, and find the stitch where the last row ended (it will be 4 stitches away from the light triangle). Line this up with your latest stitch, then flip the ears downward so they are upside down and the lighter triangle faces towards you. Insert hook into the ear’s stitch (it will be the half of the ear furthest from you), then into the head, and pull yarn up through both, as the first step of your single crochet.
15. 15sc, (begin crocheting ear onto head) 4tb, 7dc, 4hdc (15 remain on ear, includes the inner ear triangle and 4sc on each side), 8sc (add more if you want droopy ears, reduce if you want perky ears), (crochet other ear onto head) 4hdc, 7dc, 4tb (15 remain behind), 25sc (78)
16. 15sc, 15sc into one ear and head’s hdc (use remaining ear stitches), 8sc (must match what you did last row), 15sc into other ear and head (15 remaining), 25sc (78)
17-19. 78sc
It’s time to crochet the head onto the body. Depending on the tightness of your stitches, and if you modified the placement of the ears at all, the bottom of the head may be in a slightly different place. Fold the head in half so the ears line up with each other to determine where the bottom is. Then count counterclockwise 2 stitches and mark this stitch. Pick up the body and find the exposed dc loops in row 10 (the furthest row away from you if the body is facing towards you) and mark the furthest one on the right.
20. Sc around. When you reach the marked stitch, insert your hook into the exposed loops on the body first, then sc into the head. You will continue to crochet into the head and into the body at the same time, using the loops exposed by the bps dc. 4sc total. This bleeds into the next row, so consider this the new last stitch of the row. Take a second to double check that the head isn’t tilted, frog and adjust the placement if needed. (78)
21. 72sc. Crochet into the next closest row of exposed loops on the body, x6 (78)
22. Same as row 21 (78)
23. Same as row 20 (78)
24. 14sc, dec, (11sc, dec)x4, 10sc (73)
25. (10sc, dec)x5, 13sc (68)
26. 12sc, dec, (9sc, dec)x4, 9sc (63)
27. (8sc, dec)x5, 13sc (58)
28. 12sc, dec, (7sc, dec)x4, 8sc (53)
29. (6sc, dec)x5, 13sc (48)
30. 11sc, dec, (5sc, dec)x4, 7c (43)
31. (4sc, dec)x5, 13sc (38)
32. 8sc, dec, (3sc, dec)x4, 6sc … (33)
Row ends 4sc early to reset the row to the bottom of the head. Lightly stuff the head. Switch colors.
Color C (light body color)
33. (9, dec)x3 (30)
34. 30sc
35. (3sc, dec)x6 (24)
36-39. 24sc
40. (2sc, dec)x6 (18)
Stuff firmly
41. 18sc
42. (1sc, dec)x6 (12)
43. (1sc, dec)x4 (8)
44. decx2
Finish, tie off, hide tail. Embroider on the eyes and nose (visit the original pattern for details)
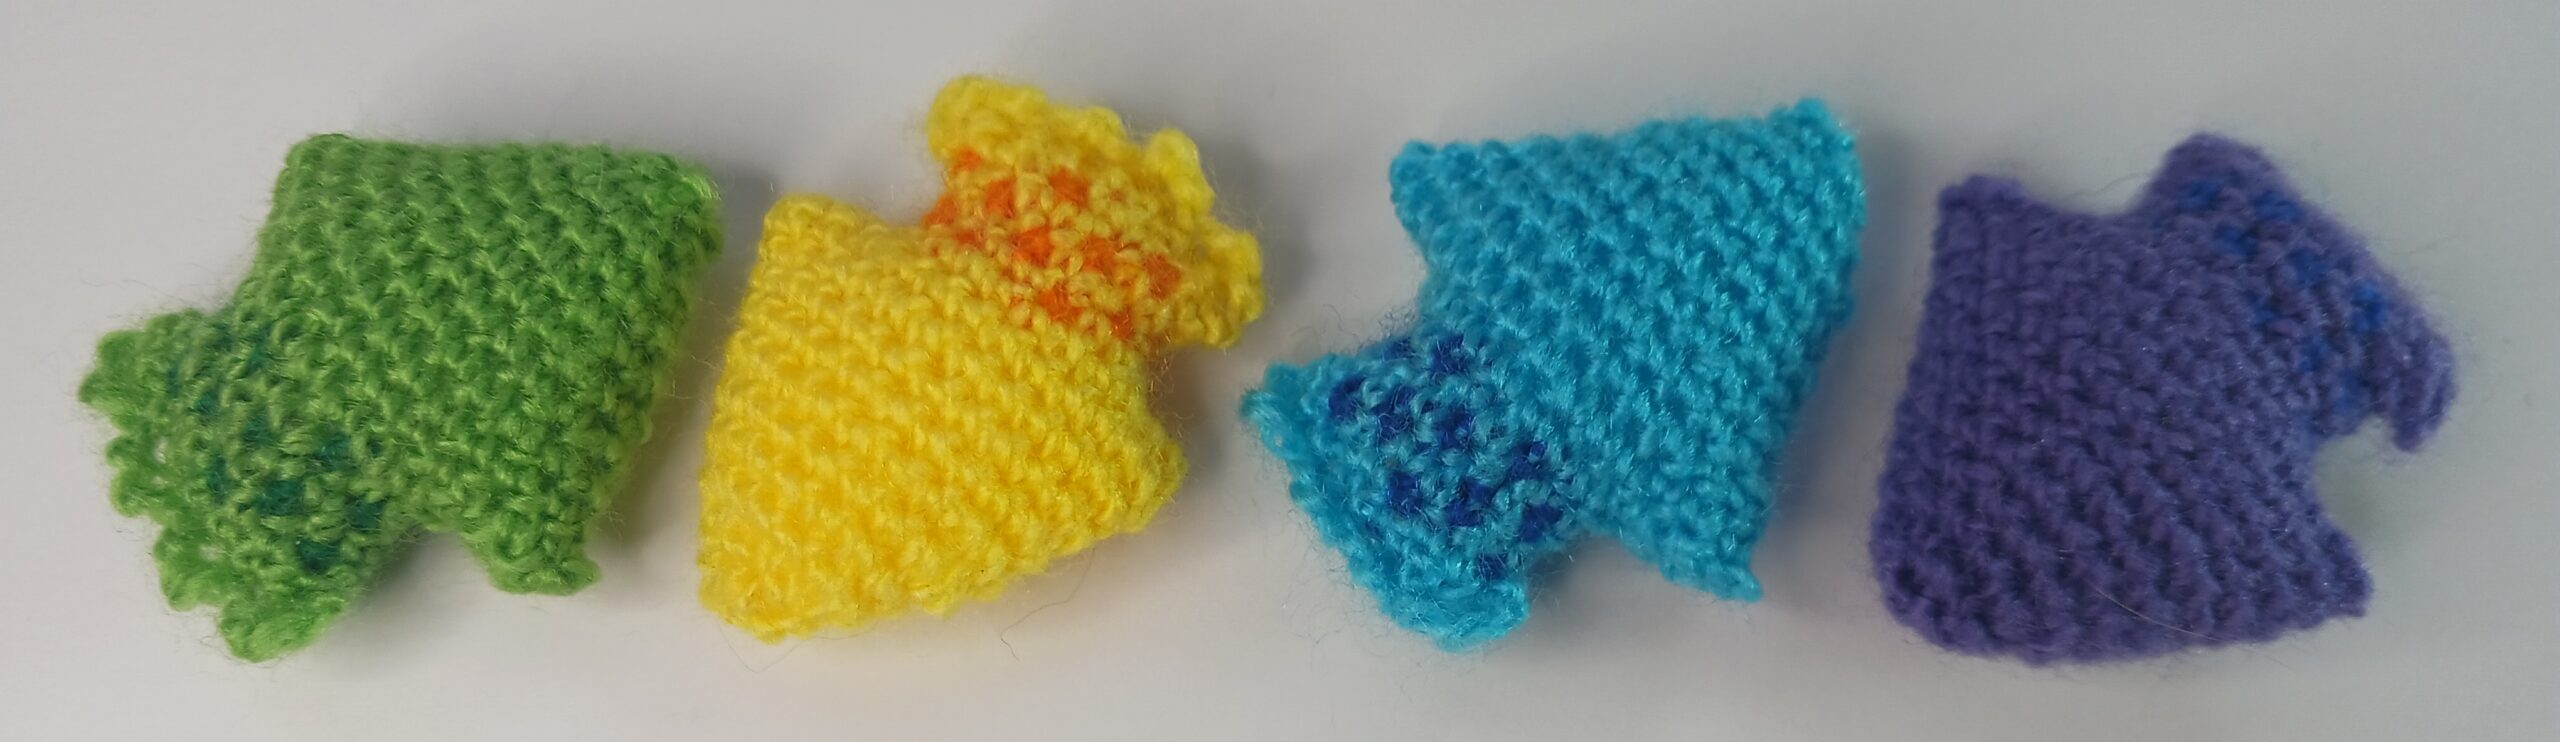
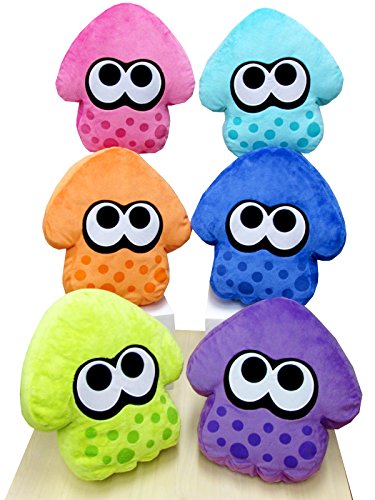
I’m an absolutely hopeless fan of Splatoon, so this was only inevitable.
This is the “mini” version of the pattern. I’m also working on a larger, pillow sized one. Working this one in medium-weight yarn makes something palm-sized, or if using light yarn, it will be keychain sized.
This pattern is also written a little oddly. Each row isn’t written out to precise numbers, instead you just use one side of the squid to stay oriented with the start and end of rows. If you can wrap your head around this, this pattern is actually very nice to follow, since you don’t have to count very high. I hate counting.
Yarn color A (main body color)
1. *Ch1 loosely. Triple into the ch on hook, into the loop underneath* Repeat * section 3 more times. (8)
It is very important to trpl into the bottom loop of the ch, not the front or back loops. You will need those for the next row. If done correctly, all 8 of your stitches will line up with each other very nicely, and will look like the top of single crochet stitches.
2. Ch1 to turn (not a real stitch). 8sc into front loop of previous chains and triples. At the end of the row, turn and 8sc into the remaining back loop (now the front loop). (16)
Find yarn color B (spot color) but don’t change colors yet.
3. Sc around(16). On every 3rd stitch, change to yarn color B for one stitch. (A, A, B, A, A, B) At the end of the row, add one extra sc, so you stay aligned with the side (assuming you’ve even been counting your total stitches). This extra stitch still counts for how you are adding the spot color every 3rd sc, so don’t lose track.
4, 5, 6. Repeat row 3, so 4 total rows have spots. You should notice how you are adding the colored stitch to the stitch immediately before the colored stitch of the previous row. Make sure you finish row 6 lined up perfectly with the side of your squid. This is likely the 3rd stitch of a your color-changing sequence, but in this case you can skip changing colors. You’re now done using Spot Color, so cut and tie off.
7. Ch4. Turn, skip a ch (this is a turning stitch), sc 3 back towards the body into underside loop. Sc along the previous row as normal, until you reach the other corner (8 stchs). Ch 4, skip a ch (turning stitch), and sc along the other side again. Sc along the rest of the row; 8sc. Again, it is very important to sc into the underside loop of your chains. The main loops of your chain stiches count as stiches, so you should have 28 total. (28)
8. Sc around. On each wing, you will sc into the sc of the previous row, and into the main loops of the ch of the previous row (but not the turning stitch). Each side should add 6 new stitches. (28)
9. Sc a couple times until you reach one side of the squid, then dec here. Continue around until you reach the other side, then dec there. (26)
10-17. From here I don’t bother counting rows. Simply continue around and around, and dec every time you reach the sides of the squid (so, that’s 2dec per row, 1 on each side). Stop when 12sc are remaining, then stuff the body.
18. Decx6, then sew closed and tie off.
You may as well use whatever color pairs make you happy, but if you’d like to select canon color schemes, I refer to these!